Tuesday, January 19, 2016

Sending an RSA encrypted message from client to Python socket server


The example below shows how to send an RSA encrypted message from a client to a Python socket server.

A Mac is used as the client, while a Raspberry Pi is used as the server. For the introduction to the Python socket server, refer to this:
Connect Mac / iPhone to a Simple Python Socket Server

Connection procedure of this example
1. Private and public keys generated in server.
2. Server enabled to listen to client.
3. Client sends "Client: OK" to server.
4. Server sends public key to client.
5. Client uses the public key to encrypt a message, which is then sent to server. 
6. Server decrypts the message and informs client "Server: OK".
7. Client tells the server to "Quit".
8. Both server and client are stopped.

Configurations for the server and client are as below:

Server (Raspberry Pi)

1. Install Python-Crypto.

sudo apt-get install python-crypto


2. Use sudo nano server_rsa.py command to edit a python file as below:

import socket
from Crypto.PublicKey import RSA
from Crypto import Random

#Generate private and public keys
random_generator = Random.new().read
private_key = RSA.generate(1024, random_generator)
public_key = private_key.publickey()

#Declartion
mysocket = socket.socket()
host = socket.gethostbyname(socket.getfqdn())
port = 7777
encrypt_str = "encrypted_message="

if host == "127.0.1.1":
    import commands
    host = commands.getoutput("hostname -I")
print "host = " + host

#Prevent socket.error: [Errno 98] Address already in use
mysocket.setsockopt(socket.SOL_SOCKET, socket.SO_REUSEADDR, 1)

mysocket.bind((host, port))

mysocket.listen(5)

c, addr = mysocket.accept()

while True:

    #Wait until data is received.
    data = c.recv(1024)
    data = data.replace("\r\n", '') #remove new line character

    if data == "Client: OK":
        c.send("public_key=" + public_key.exportKey() + "\n")
        print "Public key sent to client."

    elif encrypt_str in data: #Reveive encrypted message and decrypt it.
        data = data.replace(encrypt_str, '')
        print "Received:\nEncrypted message = "+str(data)
        encrypted = eval(data)
        decrypted = private_key.decrypt(encrypted)
        c.send("Server: OK")
        print "Decrypted message = " + decrypted

    elif data == "Quit": break

#Server to stop
c.send("Server stopped\n")
print "Server stopped"
c.close()

Client (Mac)

1. Install Python-Crypto.

sudo easy_install pycrypto

2. Use sudo nano client_rsa.py command to edit a python file as below:

import socket
from Crypto.PublicKey import RSA

server = socket.socket()
host = "192.168.xx.xx"
port = 7777

server.connect((host, port))

#Tell server that connection is OK
server.sendall("Client: OK")

#Receive public key string from server
server_string = server.recv(1024)

#Remove extra characters
server_string = server_string.replace("public_key=", '')
server_string = server_string.replace("\r\n", '')

#Convert string to key
server_public_key = RSA.importKey(server_string)

#Encrypt message and send to server
message = "This is my secret message."
encrypted = server_public_key.encrypt(message, 32)
server.sendall("encrypted_message="+str(encrypted))

#Server's response
server_response = server.recv(1024)
server_response = server_response.replace("\r\n", '')
if server_response == "Server: OK":
    print "Server decrypted message successfully"

#Tell server to finish connection
server.sendall("Quit")
print(server.recv(1024)) #Quit server response
server.close()

Result

1. Type this command at the server:

python server_rsa.py

2. Type this command at the client:

python client_rsa.py

3. Result at the server:

host = 192.168.xx.xx 
Public key sent to client.
Received:
Encrypted message = ('\x9a\xe0\x08\xa1\xb6\x86?\xc7\xde\xb6\xa0\xbe\xa7!\xecem.\xb1R\xc5h\x19cv]{\xd3\x04\xcf\x0e\xf0\xfe\xc50\x1e\xc9U\xff\xd5\xf2\xb1,EQ\xdf2\x89![\xb7s\x84:C\xbdg\xbf$\x05\'\xb8@GK\x18Q\xd5N\xe9\x13\x12e\x8c\xe7F\xc8+\x95\xcdj\xb6\xcc9\xc8-t\x17-\xb8\xdei\x8f\x90\xdd\xcf\xd9@\xa0\xf8\xe8\xe5\xcci\xea"M\x82\xb8%\xf7\xfccc G{\x16A)\xf2\xcb"\x15\xa8\x16\xd3M',)
Decrypted message = This is my secret message.
Server stopped

4. Result at the client:

Server decrypted message successfully
Server stopped


References:

Connect Mac / iPhone to a Simple Python Socket Server
Encrypt / decrypt a string with RSA public / private keys in PHP
Encrypt / decrypt a string with RSA public / private PEM files using Python
Encrypt / decrypt a string with code-generated RSA public / private keys in Python

iOS:
Encrypt / decrypt a string with RSA public / private keys in Swift

Encrypt/decrypt a string with code-generated RSA public/private keys in Python

This post shows how to:

- generate private and public RSA keys in Python.
- encrypt and decrypt a string using Python.

1. Install Python-Crypto.

sudo apt-get install python-crypto

2. Use sudo nano rsa_generate.py command to edit a python file as below:


from Crypto.PublicKey import RSA
from Crypto import Random

#Generate private and public keys
random_generator = Random.new().read
private_key = RSA.generate(1024, random_generator)
public_key = private_key.publickey()

message = "The quick brown fox jumps over the lazy dog."

#Encrypt with public key
encrypted = public_key.encrypt(message, 32)

#Decrypt with private key
decrypted = private_key.decrypt(encrypted)


print decrypted

3. Execute the file with this command:


python rsa_generate.py

References:

Encrypt/decrypt a string with RSA public/private keys in PHP
Encrypt/decrypt a string with RSA public/private PEM files using Python
Sending an RSA encrypted message from client to Python socket server

iOS:
Encrypt/decrypt a string with code-generated RSA public/private keys in Swift

Go back to Communication between iOS device (Client) and Raspberry Pi (Server)

Monday, January 18, 2016

Encrypt/decrypt a string with RSA public/private PEM files using Python

This post shows how to:

- generate private and public RSA keys using OpenSSL command.
- encrypt and decrypt a string using Python.

Public Key and Private Key Generation


1. Generate a 1024-bit private key:

openssl genrsa -out private_key.pem 1024

2. Obtain a public key from the private key:

openssl rsa -in private_key.pem -pubout -out public_key.pem

Encrypt and decrypt a string using Python

1. Install Python-Crypto.

sudo apt-get install python-crypto


2. Use sudo nano rsa.py command to edit a python file as below:


from Crypto.PublicKey import RSA

public_key_string = open("public_key.pem","r").read()
public_key = RSA.importKey(public_key_string)

private_key_string = open("private_key.pem","r").read()
private_key = RSA.importKey(private_key_string)

message = "The quick brown fox jumps over the lazy dog."

#Encrypt with public key
encrypted = public_key.encrypt(message, 32)

#Decrypt with private key
decrypted = private_key.decrypt(encrypted)

print decrypted


3. Execute the file with this command:

python rsa.py


References:
Encrypt/decrypt a string with RSA public/private keys in PHP
Encrypt/decrypt a string with code-generated RSA public/private keys in Python
Sending an RSA encrypted message from client to Python socket server

iOS:
Encrypt/decrypt a string with RSA public/private keys in Swift
Encrypt/decrypt a string with public/private keys imported from PEM files (Swift)

Go back to Communication between iOS device (Client) and Raspberry Pi (Server)

Encrypt/decrypt a string with RSA public/private keys in PHP

This post shows how to:

- generate private and public RSA keys using OpenSSL.
- encrypt and decrypt a string in PHP.

Requirements

Install these on a Raspberry Pi:
Apache HTTP server
PHP

Public Key and Private Key Generation

1. Create a folder to hold the public and private keys under /var/www:

mkdir RSA

Enter the folder:

cd RSA

2. Check man pages below and type Q to quit:

- Generate a RSA private key:

man genrsa

- RSA key processing tool:

man rsa

Check for the -pubout option. A public key will be output with this option.


3. Generate a 1024-bit private key:

openssl genrsa -out private_key.pem 1024

4. Obtain a public key from the private key:

openssl rsa -in private_key.pem -pubout -out public_key.pem


Encrypt and decrypt a string in PHP

1. Go back to the /var/www directory:

cd ..

2. Edit a PHP file with this command:

sudo nano rsa.php

3. Modify the rsa.php file as:


<?php
$fopen_private = fopen("rsa/private_key.pem","r");
$private_key = fread($fopen_private,8192);
fclose($fopen_private);

$fopen_public = fopen("rsa/public_key.pem","r");
$public_key = fread($fopen_public,8192);
fclose($fopen_public);

$pkey_private = openssl_pkey_get_private($private_key);
$pkey_public = openssl_pkey_get_public($public_key);

$data = "<P>My information";
$encrypted = "";
$decrypted = "";

//Encrypt with private key
openssl_private_encrypt($data, $encrypted, $pkey_private);
$encrypted = base64_encode($encrypted);

//Decrypt with public key
openssl_public_decrypt(base64_decode($encrypted), $decrypted, $pkey_public);
print $decrypted;

$encrypted = "";
$decrypted = "";

//Encrypt with public key
openssl_public_encrypt($data, $encrypted, $pkey_public);
$encrypted = base64_encode($encrypted);

//Decrypt with private key
openssl_private_decrypt(base64_decode($encrypted), $decrypted, $pkey_private);
print $decrypted;


?>

4. Open the php file from a browser of a remote computer.


References:
Encrypt/decrypt a string with RSA public/private PEM files using Python
Encrypt/decrypt a string with code-generated RSA public/private keys in Python
php rsa加密解密實例
php rsa加密解密实例
OPENSSL入門

iOS:
Encrypt/decrypt a string with RSA public/private keys in Swift

Monday, January 11, 2016

Connect Mac/iPhone to a Simple Python Socket Server (Raspberry Pi Part)

This example shows a simple python socket server on a Raspberry Pi. A custom port is used instead of the HTTP port 80.

The server is tested at a remote Mac computer with:
1) telnet command
2) client python code
3) iOS app on simulator

Setup a socket server

1. Edit the server.py file on Raspberry Pi with this command:

sudo nano server.py

2. Edit and save the file as:

import socket

mysocket = socket.socket()
host = socket.gethostbyname(socket.getfqdn())
port = 9876

if host == "127.0.1.1":
    import commands
    host = commands.getoutput("hostname -I")
print "host = " + host

#Prevent socket.error: [Errno 98] Address already in use
mysocket.setsockopt(socket.SOL_SOCKET, socket.SO_REUSEADDR, 1)

mysocket.bind((host, port))

mysocket.listen(5)

c, addr = mysocket.accept()

while True:

    data = c.recv(1024)
    data = data.replace("\r\n", '') #remove new line character
    inputStr = "Received " + data + " from " + addr[0]
    print inputStr
    c.send("Hello from Raspberry Pi!\nYou sent: " + data + "\nfrom: " + addr[0] + "\n")

    if data == "Quit": break

c.send("Server stopped\n")
print "Server stopped"
c.close()

3. Enable the server with this command:

python server.py

Results on a remote Mac computer


1) telnet command

1. Type this command to connect to Raspberry Pi:

telnet 192.168.xx.xx 9876

2. Type these strings:

this is mac
have a nice day
abcdefg
Quit


2) client python code


1. Edit a simple client.py file on Mac as:


import socket

server = socket.socket()
host = "192.168.xx.xx"
port = 9876

server.connect((host, port))
server.sendall("This is client")
print(server.recv(1024)) #Normal server response
server.sendall("Quit")
print(server.recv(1024)) #Quit server response

server.close()

2. Execute the client.py file on Mac terminal:

python client.py


3) iOS app on simulator

Create an iOS app with Swift. See this:
Connect Mac / iPhone to a Simple Python Socket Server (iOS Part)

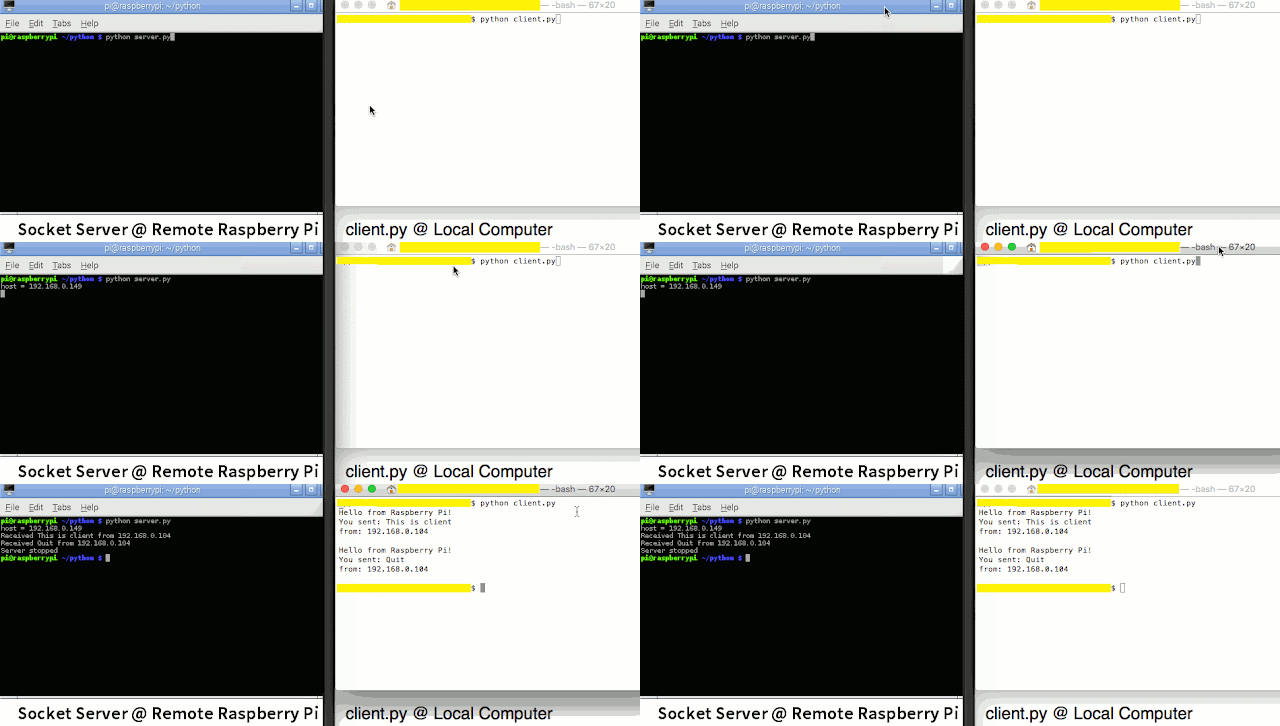
And the result is:


References:
Connect iOS device to HTTP GET/POST PHP service (Raspberry Pi Part) (iOS Part)
Connect iOS device to MySQL database on a server (Raspberry Pi Part) (iOS Part)
Connect Mac/iPhone to a Simple Python Socket Server (iOS Part)
Sending an RSA encrypted message from client to Python socket server

Go back to Communication between iOS device (Client) and Raspberry Pi (Server)

Thursday, January 7, 2016

以SSH指令遠端存取樹莓派

樹莓派SSH (Secure Shell) 伺服器的預設值是啟動的。若要使用SSH遠端登入樹莓派,步驟如下:

1. 輸入 ifconfig 或是hostname -I 以取得樹莓派的IP address。

2. 如果要遠端使用的是Mac蘋果電腦,打開它的終端機Terminal:

Finder -> Applications -> Utilities -> Terminal

3. 在終端機中輸入這個指令:

ssh pi@192.168.x.x

並輸入密碼。


4. 要結束SSH連線時,輸入 exit


==================

如何關閉或開啟SSH server

1. 使用這個指令開啟軟體設定工具(software configuration tool):

sudo raspi-config

2. 選擇 8 Advanced Options


3. 選擇 A4 SSH


4. 選擇 disable或enable


5. 如果選擇了關閉 SSH server,使用這個指令將樹莓派重新開機:

sudo reboot

6. 如果 SSH server已關閉,使用先前的 ssh pi@192.168.x.x 終端機指令的結果是:


==========
English version of this post:
Remote access to Raspberry Pi using SSH terminal command

Tuesday, January 5, 2016

Raspberry Pi 樹莓派設定步驟

因為樹莓派(Raspberry Pi 2 Model B)太久沒用開不了機
重新記錄一下安裝設定的步驟,以免忘記:

1. 選購樹莓派並安裝Raspbian作業系統

2. 設定為美式鍵盤 (因為預設的英式鍵盤會有些問題)

3. 連上Wi-Fi網路

4. 輸入以下指令更新並升級:
sudo apt-get update
sudo apt-get upgrade

5. 設定日期時間

6. 如需遠端終端機存取,則使用SSH指令

7. 如需遠端桌面存取,則安裝VNC伺服器

8. 如需交換檔案,則安裝Samba伺服器

9. 安裝阿帕契Apache網頁伺服器

10. 安裝PHP 如何建立PHP檔案:PHP Basics

11. 安裝MySQL資料庫伺服器

注意: Linux + Apache + MySQL + PHP 一起稱為 LAMP

12. 設定中文作業環境:
Raspberry Pi 樹莓派的中文設定
在樹莓派上安裝中文字型
在樹莓派上使用免費的辦公室軟體 - LibreOffice

13. 視需求安裝Vim文字編輯器

14. 安裝FTP等其他Servers (未來再新增這部分)

How to use the vim text editor

1. Install vim with this command:

sudo apt-get install vim


2. Edit an HTML file with the commands below (Please ensure that Apache HTTP server has been installed.):

cd /var/www
sudo vim test.html

3. Type i or a or o to enter the insert mode.

4. Edit these:

<html>
<title>My Title</title>
<body>
<P>Edited by Vim.
</body>

</html>

5. Quit the insert mode with the Esc key.

6. Exit the vim editor and save the file with this command:

:wq

If you want to quit without saving:

:q!

Note: Hitting the Esc key to quit the insert mode is required before typing the : commands to exit vim.

7. Open the file from a remote browser:

Basic vim commands:

highlight one line - V
highlight area - v
copy - y
paste - p
undo - u
redo - Ctrl + r
search - /

Reference:
Editor War (Wikipedia)
如何使用vim文字編輯器(Chinese Version of this post)

Monday, January 4, 2016

如何設定樹莓派的Wi-Fi無線網路連線

本文使用的是Raspberry Pi 2 Model B
Raspberry Pi 3 的設定方式可能有所不同
因為已內建Wi-Fi
故不用選購Wi-Fi網卡

這篇文章是以Raspbian作業系統為例

若要以無線的方式將樹莓派連上網路
則需要一個USB網卡(WiFi dongle)
我所購買的是 EDUP EP-N8508GS

您也可參考相容的USB Wi-Fi adapter清單
或是向台灣樹莓派等店家購買


在終端機輸入 lsusb
成功偵測到 802.11n WLAN adapter

以下為英文的介面
選擇 Menu -> Preferences -> WiFi Configuration

選擇wpa_gui中的Manage Networks -> Scan 


選擇要連接的Wi-Fi熱點
按兩下滑鼠左鍵

接下來會出現以下的畫面
輸入密碼

選擇 Current Status -> Connect
如果像以下的畫面沒有連線成功
請檢查密碼

正確輸入密碼後
連線成功!
記住以下的IP address

在終端機輸入ifconfig
wlan0的IP位置應和之前 wpa_gui中的一樣

也可使用 hostname -I 指令

這樣就成功了
您可以打開樹莓派的Epiphany瀏覽器上網!

重新開機時也應可自動連上網

===============

這篇文章的英文版:
English Version of this Post: